Showing posts with label crafts. Show all posts

Friday, October 24, 2014

Easy Silhouettes


Let's face it.  We all have a project that we've been 'meaning to get to'.   For me it was silhouettes of the kids.   It's been my plan since the day we moved in to get frames of them up and I've just never taken the opportunity to do it.  


 I was shopping at Ross a couple weeks ago and I knew this framed saying would be a great centerpiece to anchor the silhouette wall.  

It's been ages since I've tackled a great project anyway.  And with my long recovery at home, I might as well do something with my hands.  They turned out amazingly well!  I really love it and can't believe I waited so long.

I'll show you how I did it.


Now, when I say "the day we moved in" I'm not exaggerating.  My begin-with-the-end-in-mind self took these profile photos on the day we unloaded the truck at our new house.  It was nighttime, and I think they really enjoyed me forcing a pic before setting up their beds (snort).

I recommend doing it with better lighting, as I really hated the shadows I had to deal with when cutting.  

Why the day we moved in?  I wanted them to be the exact age in the silhouette that they were when we set foot in our new home.   Sappy.


In a Windows Photo Gallery I changed the saturation and tint so I could print them with just a bit of black ink, cuz I'm cheap.  You want plenty of contrast though, or the next step is too hard.


I cut them out, adding hair features and embellishing a bit (football game optional).  Printing the black & white version on regular paper made them easy to cut and retain facial features.  It still took me a few tries on a couple of the kids.  Even though they'd eventually be facing to the right, I kept flipping them to the white side to get a feel for how they'd look when solid color.  

I used my family for feedback.  If a kid hated how they looked, I realized I probably had to rework their details, and eventually everyone was happy.


After the paper templates were done I placed them on heavy black paper and traced.


I had to try two different cardstocks.  The weight of the first was too heavy and stiff.  Impossible to cut the details out.  A lighter weight one was perfect.


I found simple black frames at the dollar store and used a sky blue herringbone cardstock as a mat for the black profiles.  I just stuck them on the blue background with a tiny roll of scotch tape.

 I. LOVE. THEM.


It wasn't hard and it was so fun to do.  I spent $5 on the five frames at Dollar Tree and already had the paper on hand.


 "First we had each other.  Then we had you.  Now we have everything"


I decided to find a moment and do something I've really been wanting.  And it's fabulous.   

We hung it last night and I've been smiling all day.


Update: Nov 2015


I was nervous about the spacing of the silhouettes since we got our fireplace.  But I left them in their same spot and so far I like it, even if it's a bit off balance.  I usually try to offset it with some height on the left side of the mantle.  

What do you think?


Linking up to Melissa's Under $10 Under 1 Hour Fall Party


In case you missed it:
Day 1 - introducing 31 days
Day 2 - Inspiring quotes + bath update
Day 3 - Purple Pride
Day 4 - Listen; He'll speak
Day 5 - Powerful words


Day 6 - Zucchini bread
Day 7 - End table vignette
Day 8 - Letting go
Day 9 - Repurpose
Day 10 - Lead me, guide me

Wednesday, January 8, 2014

Command center update


I finally made a sign to hang above the command center wall that I shared in this post.  


We already had an old knotty weathered board that I loved.


I had someone here in town cut some vinyl for me.  But I used the negative image so it worked as a stencil.   I very lightly dabbed paint on with a dauber and a pouncing motion.  It came out perfectly. I originally planned on sanding over the dry words to age them a little.  But since I used so little paint you can still see the wood through the letters, so I left it.


It's the look I was trying for!

Saturday, November 23, 2013

Christmas Advent Calendar

I put together a craft for my neighborhood a few weeks ago and I wanted to share with you this easy Christmas countdown.  We have one week till December is upon us!


You'll need

coin envelopes
patterned paper
white or cream cardstock
ink pad for distressing
circle punch
scallop punch
mini clothespins
star stickers (like for reward charts)
jute or twine
slips of papers for family activities


Print numbers 1-24 in various fonts in a size that will fit your circle punch.  Ink the edges of each number.  I punched a ton of scallops to be a background to my numbers.  You could also make these square if you don't have a scallop.  Glue numbers to patterned papers.  Glue patterned paper to coin envelope.  Embellish with stars if you want. Clip to jute with clothespins.


Then sit down with a December calendar and your family, and decide what traditions and activities you want to do on certain days leading up to Christmas.  Incorporate long time traditions with some new ideas too.  Google can help.  Here's a tip if you're trying to simplify - every few days put "read a Christmas book" or "have a piece of candy" in there.  It will be easy and inexpensive.  That's me, cheap and easy (kidding!).


Some shopping notes.

This is the very best deal I could find on the little envelopes.  Coin envelopes on Amazon.
 Now, I know you probably don't need 500.  Remember, I was mass producing.  Other little sets of kraft envelopes or glassine envelopes from Michaels or Hobby Lobby would be adorable.

The cheapest mini clothespins come in a 50 pack which is $2 at my Walmart.

Teaming up with a friend definitely works on a project like this one!  And hey, if all else fails, grab little envelopes and a Sharpie.  What matters are the family memories that result from this.  Not the presentation.


Special thanks to Jeni from Fancy Schmancy for loaning me the PERFECT circle punch I needed.

Of note:  This version served as inspiration for me: paper sack and clothespin advent


I think this would be stellar across a mantle, but alas, I have none.


 Doors work too.


Merry Christmas!


Wednesday, August 28, 2013

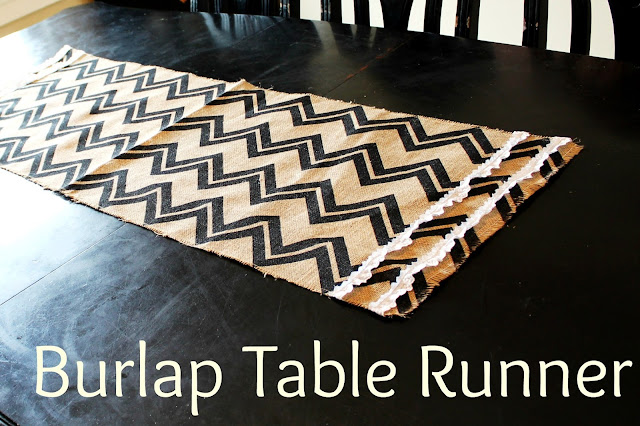
Burlap table runner


Last week, with Strider out of town and the impending school year encroaching on my freedom, I was craving something crafty.  I felt suffocated and needed an outlet.  I wanted something for my dining room table and didn't want to spend much (shocker).


I saw a couple of these runners and used them as inspiration.  I went to Walmart to get some burlap.  To my surprise, they had printed burlap!  Some might be over the chevron craze, but I still love it.

This burlap was 60" wide on the bolt, and I thought it was the perfect length for a runner.


The fabric is only $3.97/yd, and I bought a little less than half a yard.  I showed the cutting lady how wide (how many zig zags) I wanted and she cut it precisely where I needed her to, and charged me exact.  No waste.  No cutting or trimming at home.   So, like $1.75 for burlap.  Yeah!


I wanted a trim on the ends, but because the burlap had a bold pattern,  a smallish one.  I saw this narrow eyelet ruffle for a little over $1/yd.  I got 2 yards for making 4 stripes.


I dusted off the sewing machine and cranked this out in about 15 min.  Burlap sheds mercilessly, so don't forget to finish the edges!

Modern and rustic.  Frill and casual.  Easy, and $4.  Total.


The day I made this I kept watching out the window and wondering if my peach tree would break from the weight!  We got a great harvest.


Don't you feel better after you make something?  I sure do.


Linking up with:  Not Just a Housewife


A Bowl Full of Lemons


Tuesday, December 11, 2012

Christmas prep


For a countdown to the big day, I went with candy this year.  We took an evening and put together little numbered packets.

 
They sit in a basket in the living room and the kids take turns each morning opening one and passing out a hershey kiss or miniature to each kid.

 
We took tubes of cardstock and taped them sour cream container style.  You know, flatten one end one way, then the other end the opposite way.  Before closing them up we included a joke in each one. 
 
Scrapbook number stickers mark each day's packet.  This photo was at the beginning.  I can't believe how empty the basket already looks now.  December is flying by!


I am beside myself - I think I neglected to post about my stockings last year.  Now that our family is done growing I was fed up with the mismatched stockings.  I hated them.  I also hated that all cute stockings were $8-20 each in stores.  That adds up. 

 
I found maroon and cream sheets at the thrift store and made my own pattern and made 7 monogrammed stockings with coordinating boy-girl colors for about $5.  Much better!  And this year I have them hung from the loft which I love.  It's working out well. 
 
 
How ever YOU prepare for the season, I hope it's enjoyable!
 
Now we need a tree...